How to Drop a Table in SQL Server
Dropping a table in SQL Server is a common task, but it’s also one that requires caution. When you drop a table, you permanently delete it along with all its data, indexes, triggers, and constraints. Whether you’re cleaning up your database or restructuring it, knowing how to safely drop a table is essential. In this guide, we’ll walk you through the steps to drop a table using SQL Server Management Studio (SSMS) and SQL commands, along with some important tips to avoid mistakes.
Why Would You Drop a Table?
Before we dive into the steps, let’s understand why you might need to drop a table:
- Database Cleanup: Remove unused or outdated tables to keep your database organized.
- Schema Changes: Drop tables as part of a database redesign or migration.
- Testing: Delete temporary tables created during development or testing.
Important Note: Dropping a table is irreversible. Once dropped, the table and all its data are permanently deleted. Always ensure you have a backup of the table or database before proceeding.
Method 1: Dropping a Table Using SQL Server Management Studio (SSMS)
SQL Server Management Studio (SSMS) is a graphical tool that makes it easy to manage SQL Server databases. Here’s how to drop a table using SSMS:
Step-by-Step Guide
- Open SSMS and Connect to Your SQL Server Instance
- Launch SQL Server Management Studio.
- Connect to the SQL Server instance where your database is located.
- Locate the Table
- In the Object Explorer pane on the left, expand the database containing the table you want to drop.
- Expand the Tables folder to see the list of tables.
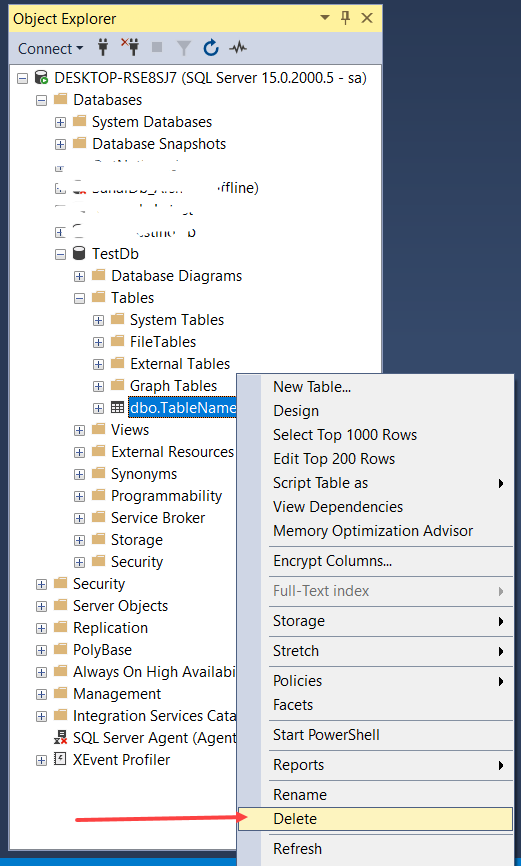
- Delete the Table
- Right-click on the table you want to drop.
- Select Delete from the context menu.
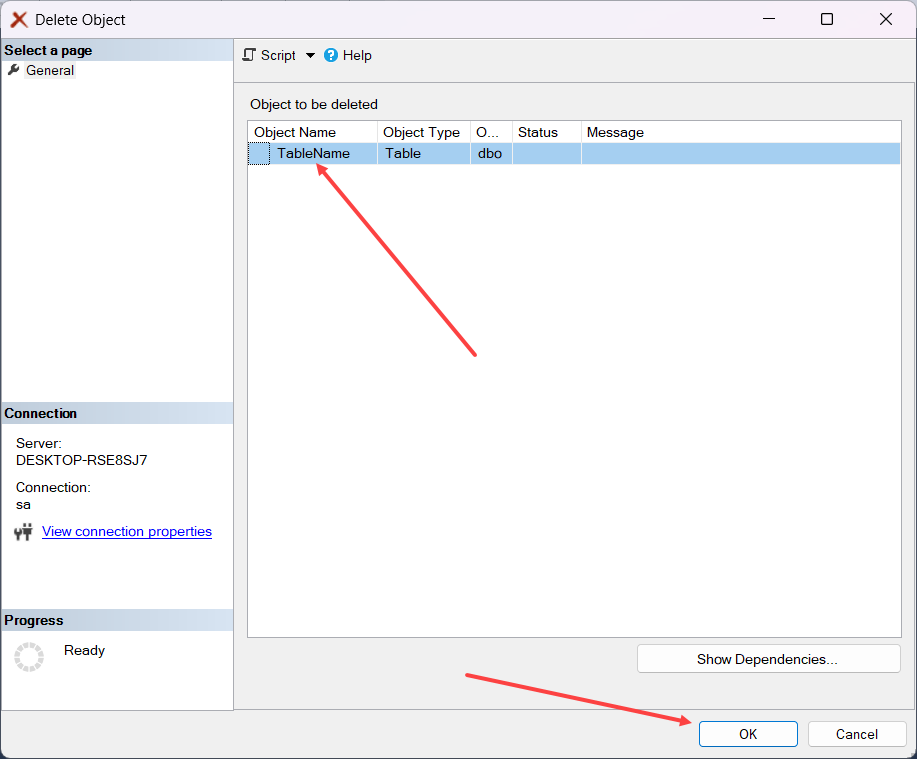
- Confirm Deletion
- A confirmation dialog box will appear.
- Double-check that you’ve selected the correct table.
- Drop the Table
- Click OK to confirm and drop the table.
- The table and all its data will be permanently deleted.
Method 2: Dropping a Table Using SQL Commands
If you prefer working with SQL commands, you can drop a table using a simple query. This method is especially useful for automation or scripting.
Step-by-Step Guide
- Open SSMS and Connect to Your SQL Server Instance
- Launch SQL Server Management Studio.
- Connect to the SQL Server instance where your database is located.
- Open a New Query Window
- Click on New Query in the toolbar or press Ctrl + N.
- Write the DROP TABLE Command
- Use the following SQL command to drop a table:
DROP TABLE TableName;
Replace TableName with the actual name of the table you want to drop.
- Example:
DROP TABLE Employees;
- Execute the Query
- Click the Execute button in the toolbar or press F5 to run the query.
- The table will be dropped immediately.
Important Considerations
Before dropping a table, keep the following in mind:
Example Scenario
Let’s say you have a table named OldEmployees that is no longer needed. Here’s how you would drop it using SQL commands:
-- Step 1: Check for dependencies
EXEC sp_depends 'OldEmployees';

-- Step 2: Drop the table
DROP TABLE OldEmployees;
This ensures that there are no dependencies and the table is dropped safely.
Conclusion
Dropping a table in SQL Server is a straightforward process, but it requires caution. Whether you use SQL Server Management Studio or SQL commands, always ensure you have a backup and double-check the table name before proceeding. By following the steps outlined in this guide, you can safely and effectively drop tables in SQL Server.
Remember: Once dropped, a table cannot be recovered. Proceed with care!
FAQs
- Can I recover a dropped table?
- No, unless you have a backup. Always back up your table or database before dropping it.
- What happens to the data after dropping a table?
- The data is permanently deleted, and the table is removed from the database.
- Can I drop a table that is being used by other objects?
- You can, but you need to remove or update the dependencies first. Use
sp_depends to check for dependencies.
- What if I accidentally drop the wrong table?
- If you have a backup, you can restore the table. Otherwise, the data is lost permanently.